Deploy with ServiceAccount
These are the steps you can follow to create a service account to use in a CI/CD pipeline / Ansible playbook
Prerequisites
- You need to have an account and project on the Container Platform.
- You need to have the OpenShift client tools installed.
- You need to be admin for your own project(s) (key-user)
Roles in OpenShift
OpenShift has some default roles in the cluster. For example:
| Role | Description |
|---|---|
| admin | A project manager. If used in a local binding, an admin has rights to view any resource in the project and modify any resource in the project except for quota. |
| edit | A user that can modify most objects in a project but does not have the power to view or modify roles or bindings, usually a developer role |
| view | A user who cannot make any modifications, but can see most objects in a project. They cannot view or modify roles or bindings. |
Roles at the Utrecht University
At the University, we basically have two roles:
| Role | Description |
|---|---|
| key-user | A user with the OpenShift admin role, who can create projects / project users |
| developer | A user with the OpenShift edit role |
A key-user can create service accounts for Developers in the projects they are admin in.
Steps
Here the project uu-boon0004 will be used as example OpenShift project.
-
A key-user should log in to the OpenShift GUI.
- Go to OpenShift Console
- Enter your UU credentials and MFA token.
For more information about logging in visit: openshift Login
- Click your username and the top right, followed by copy login command.
Press display token, copy login with this token. Such as:
-
Default service accounts
By default, when a project is created, several service accounts are also created:
These service accounts do not have enough permissions for a developer to work with, so a new service account can be created. -
Create service account by key-user
First create a service account, this can be any name you like, but ofcourse it should be something meaningful.
This service account does not have any permissions when created so can't do anything.$ oc project uu-boon0004 Already on project "uu-boon0004" on server "https://api.cl01.cp-acc.its.uu.nl:6443". $ oc create sa deploy-to-openshift serviceaccount/deploy-to-openshift created
The edit role can be added to this service account.The -z should be used so OpenShift knows you mean a service account.$ oc policy add-role-to-user edit -z deploy-to-openshift --rolebinding-name=edit-deploy-to-openshift-sa clusterrole.rbac.authorization.k8s.io/edit added: "deploy-to-openshift"
The --rolebinding-name is optional too, then the rolebinding name is edit, edit-0 etc. -
service accounts tokens
When you read this, our clusters are probably upgraded to OpenShift version 4.16.
Prior to OpenShift Container Platform 4.16, a long-lived service account API token secret was also generated for each service account that was created.
Starting with OpenShift Container Platform 4.16, this service account API token secret is no longer created.
So we have to create a token manually.
This can be done with the oc create token command, followed by the service account and the duration. In this example, 2628000m is used which is 5 years, but of course it is better to rotate service account tokens regularly.$ oc create token deploy-to-openshift --duration=2628000m eyJhbGciOiJSUzI1NiIsImtpZCI6IjQtX1c4bzMtTENtLS0zNExKel9ZeFFPZHg5UmJMQ1A1U3R2MFBnVFF1RWcifQ.eyJhdWQiOlsiaHR0cHM6Ly9rdWJlcm5ldGVzLmRlZmF1bHQuc3ZjIl0sImV4cCI6MTg4Mzc0ODQ3OSwiaWF0IjoxNzI2MDY4NDc5LCJpc3MiOiJodHRwczovL2t1YmVybmV0ZXMuZGVmYXVsdC5zdmMiLCJrdWJlcm5ldGVzLmlvIjp7Im5hbWVzcGFjZSI6InV1LWJvb24wMDA0Iiwic2VydmljZWFjY291bnQiOnsibmFtZSI6ImRlcGxveS10by1vcGVuc2hpZnQiLCJ1aWQiOiI0YzU2ZTRkYy0wZGU1LTQxYmYtODA2OC05NzMzMmY0NDRmNjcifX0sIm5iZiI6MTcyNjA2ODQ3OSwic3ViIjoic3lzdGVtOnNlcnZpY2VhY2NvdW50OnV1LWJvb24wMDA0OmRlcGxveS10by1vcGVuc2hpZnQifQ.PDlJ9S92SOcjetYL9u1LsK8k5UcMBGZwZ-lQB1in1tWvG__mjZzJvcyiY88elu2XcXtKkvaqUzhuzcS692snsWYZyEC0v1EpIV3Be4Nu50VZvafc4plXc0mHQYM7UcHwnqbXeljOSJcODNvXfBbkqR8Vv9gLrJsX8RU1dLptMZUogUiP7nIhf8J1twrDA4uAouCd86DdkXar7nmZ-hxlrpbNYW83EhxlqJ6nPPt9GImXgeIeoTxhx1ZQ4e3WiAWSSbwQmWcmxoFDfIWv_qVpE5Kd8rC7kmaBwPCJteAkIbMrWi_GQZQDd06omdAdocl2VkZqTT2Az9M2fyei2npSsFtiKth_FF0VLIH6XGnxbjJomHzre7cJVqPW8QTMFxh4MPeRou0kijddCm3P6z7iyZ92Me_txTx_YOmoSIbUz4_2cdVbN8SesYXTosZAXLljzmzNCfGk-x3di_h5RGSqHrjqbPmYcqFYZb7fSfZfev21A20RVruXiUrsfoMkVocCyBa4moe9K4SSxA5jFN_6q7N_t3AMnBX0qhbMWl4U8gjVM_ubMBTS3uA65_LCOst6ZjiwAKK8cugBTueumcjDSKPRilXZWq1ef4dHscE1XY9Mni5wk9gNBe79fAeu2STWW5dtAm5rT-S_UL50k5aujI32e3G9zvNJv_9IB7uJLS0 -
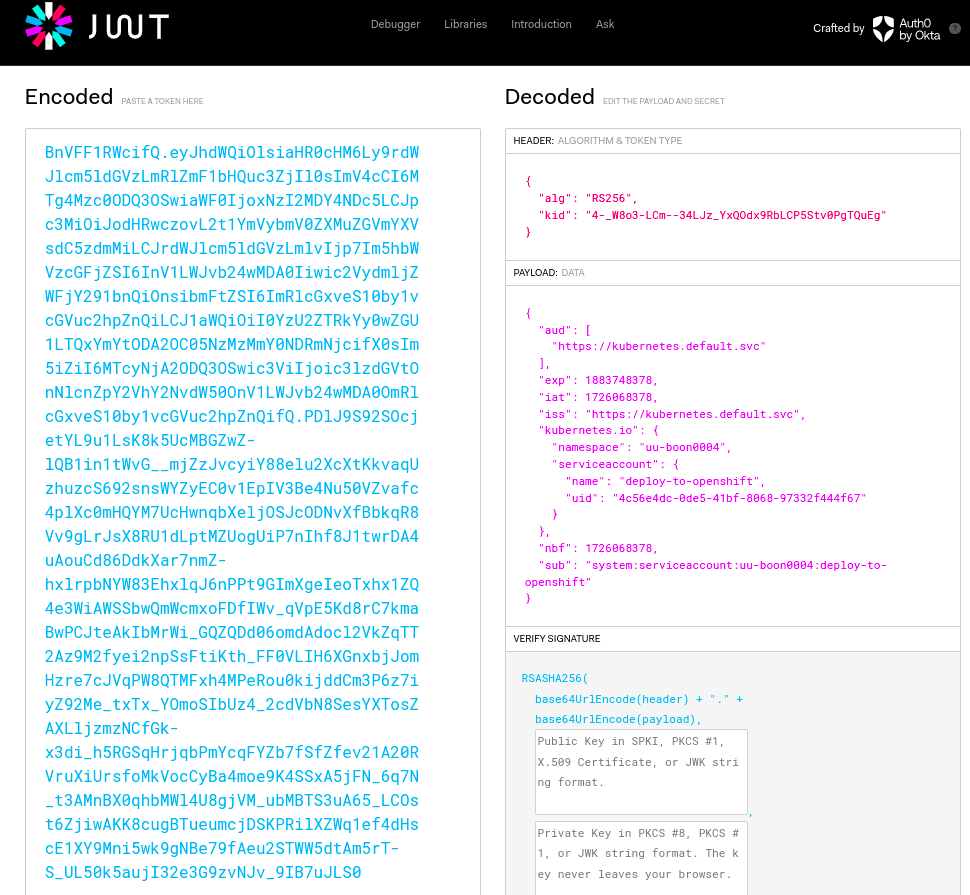
Check token in jwt
The token holds all the information necessary to login. This information can be viewed in a jwt browser, such as jwt.io
-
Login with token
ofcourse this service account should be used in a GitHub / Gitlab pipeline, Jenkins pipeline, Ansible playbook etc, but you can also login with it to test if it actually works.
Service accounts in OpenShift have the format system:serviceaccount:namespace:serviceacccountname -
Create a test pod
Now let's create a test pod with the service account.